Installation
Autopilot must be installed on the devices running the Terminal and the Pilot agents. The Pilot runs on a Raspberry Pi (remember: Pi for “Pilot”) and the Terminal runs on a regular desktop computer. So Autopilot must be installed on both. This document will show you how to do that.
Supported Systems
OS |
|
Python Version |
>=3.7,<3.10 |
Raspberry Pi |
>=3b |
Autopilot is linux/mac only, and supports Python 3.7 - 3.9 (3.10 will be supported after updating the terminal to use PySide 6). Some parts might accidentally work in Windows but we make no guarantees.
We have tried to take care to make certain platform-specific dependencies not break the entire package, so if you have some difficulty installing autopilot on a non-raspberry-pi linux machine please submit an issue!
Note
The latest version of raspiOS (bullseye) causes a lot of problems with the Jack audio that we have not figured out a workaround for. If you intend to use sound, we recommend sticking with Buster for now (available from their legacy downloads section).
Pre-installation
On the Pilot device
For Pilots, we recommend starting with a fresh Raspbian Lite image (see the raspi installation documentation). Note that the Lite image doesn’t include a desktop environment or GUI, just a command-line interface, but that’s all we need for the Pilot. It’s easiest to connect a monitor and keyboard directly to the Pi while configuring it. Once it’s configured, you won’t need to leave the monitor and keyboard attached, and/or you can choose to connect to it with ssh.
After the Pi has been started up for the first time, run sudo raspi-config to do things like connect to a wifi network, set the time zone, and so on. It’s very important to change the password for the pi user account to a new one of your choice so that you don’t get hacked, especially if you’re opening up ssh access.
It’s also best to update the Pi’s operating system at this time:
sudo apt update
sudo apt upgrade -y
Now install the system packages that are required by Autopilot.
You can do this by running this command, or it’s also available as a setup script
in the guided installation of Autopilot. (python -m autopilot.setup.run_script env_pilot)
sudo apt install -y \
    python3-dev \
    python3-pip \
    git \
    libatlas-base-dev \
    libsamplerate0-dev \
    libsndfile1-dev \
    libreadline-dev \
    libasound-dev \
    i2c-tools \
    libportmidi-dev \
    liblo-dev \
    libhdf5-dev \
    libzmq-dev \
    libffi-dev
On the Terminal device
The following system packages are required by PySide2 (which no longer packages xcb):
sudo apt-get update && \
sudo apt-get install -y \
  libxcb-icccm4 \
  libxcb-image0 \
  libxcb-keysyms1 \
  libxcb-randr0 \
  libxcb-render-util0 \
  libxcb-xinerama0 \
  libxcb-xfixes0
Installing Autopilot
Now we’re ready to install Autopilot on both the Pilot and Terminal devices. Follow the same instructions on both the Pi and the computer.
We recommend using autopilot within a virtual environment. Since v0.5.0 autopilot has been packaged
with poetry , which manages its own environment, but instructions for
using virtualenv and conda are in the guide page guide_venvs .
Optional dependencies
Since autopilot is intended to be deployed as differentiable agents, we have separated the requirements
into different groups of optional dependencies. In each of the following commands, use the appropriate
package specifier like pip install auto-pi-lot[pilot] or poetry install -E pilot
pilot - includes
pigpioto control GPIO pins and other pi-specific requirementsterminal - includes
PySide2and other terminal-specific requirementsdocs - includes
Sphinxet al.tests - includes
pytestet al.
Method 1: Installation from PyPI
If you’re just taking a look at Autopilot, the easiest way to get started is to install it from PyPI!
pip3 install auto-pi-lot
Method 2: Installation from source
If you want to start writing your own experiments and tinkering with Autopilot, suggest you clone or fork the repository . One of the design goals of autopilot is to minimize the distinction between “developer” and “user,” so we like to encourage people to get their hands dirty with the source so your wonderful work can be integrated later.
First clone the repository:
git clone https://github.com/wehr-lab/autopilot.git
cd autopilot
Install with poetry - if you have poetry installed (pip install poetry), it is easiest to use it
to manage your autopilot environment:
poetry shell
poetry install
# or if installing optional dependencies
# poetry install -E <optional>
Install with pip - install an “editable” version with -e, this makes it so python uses the source code in your cloned repository, rather than from the system/venv libraries:
pip3 install -e . [<optional>]
Note
Depending on your permissions, eg. if you are not installing to a virtual environment, you may get a permissions error and need to install with the --user flag
Note
Development work is done on the dev branch, which may have additional features/bugfixes but is much less stable!
To use it just git checkout dev from your repository directory.
Extra Dependencies
Different deployments depend on different packages! Eg. `Pilot`s on raspberry pis need some means of interacting with the GPIO pins, and `Terminal`s need packages for the GUI. Rather than requiring them all for every installation, we use a set of optional dependencies.
Depending on how you intend to use it, you will likely need some additional set of packages, specified like:
pip install auto-pi-lot[pilot]
# or
pip install auto-pi-lot[terminal]
# or if using an editable install
pip install .[pilot]
Configuration
After installation, set Autopilot up! Autopilot comes with a “guided installation” process where you can select the actions you want and they will be run for you. The setup routine will:
install needed system packages
prepare your operating system and environment
set system preferences
create a user directory (default
~/autopilot) to store prefs, logs, data, etc.create a launch script
To start the guided process, run the following line.
python3 -m autopilot.setup
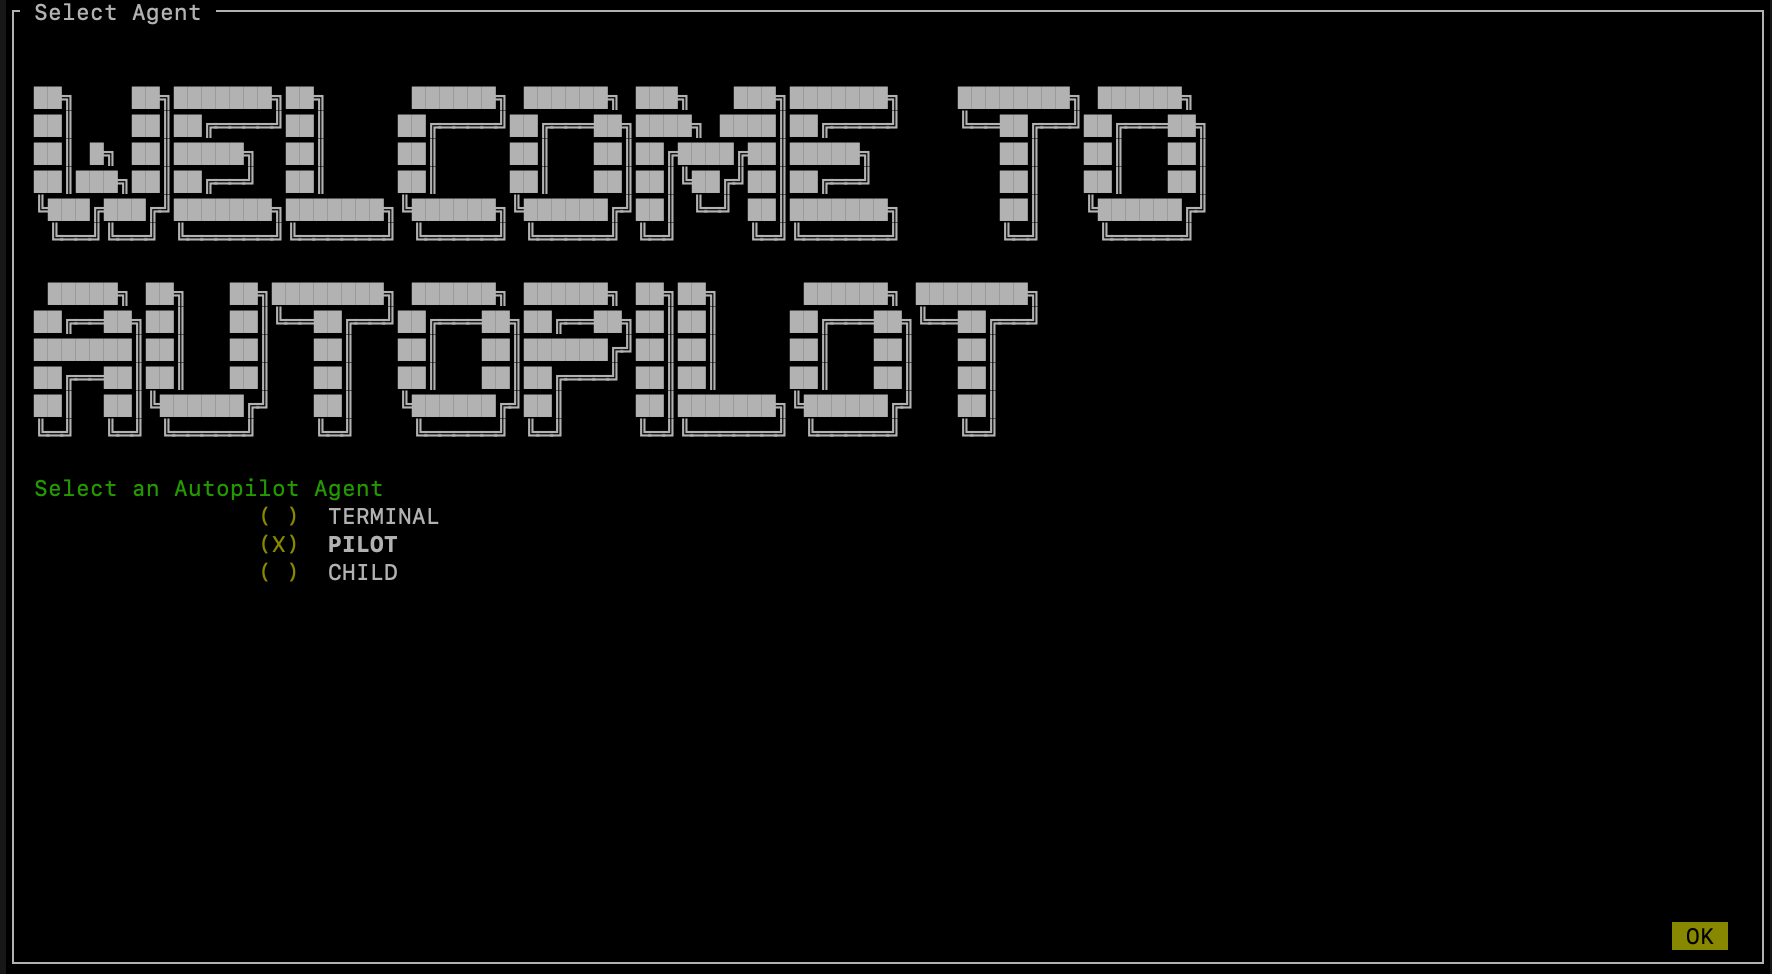
Select agent
Each runtime of Autopilot is called an “Agent”, each of which performs different roles within a system, and thus have different requirements. If you’re running the setup script on the Pi, select “Pilot”. If you’re running the setup script on a desktop computer, select “Terminal”. If you’re configuring multiple Pis, then select “Child” on the child Pis. Then hit “OK”.
You can navigate this interface with the arrow keys, tab key, and enter key.
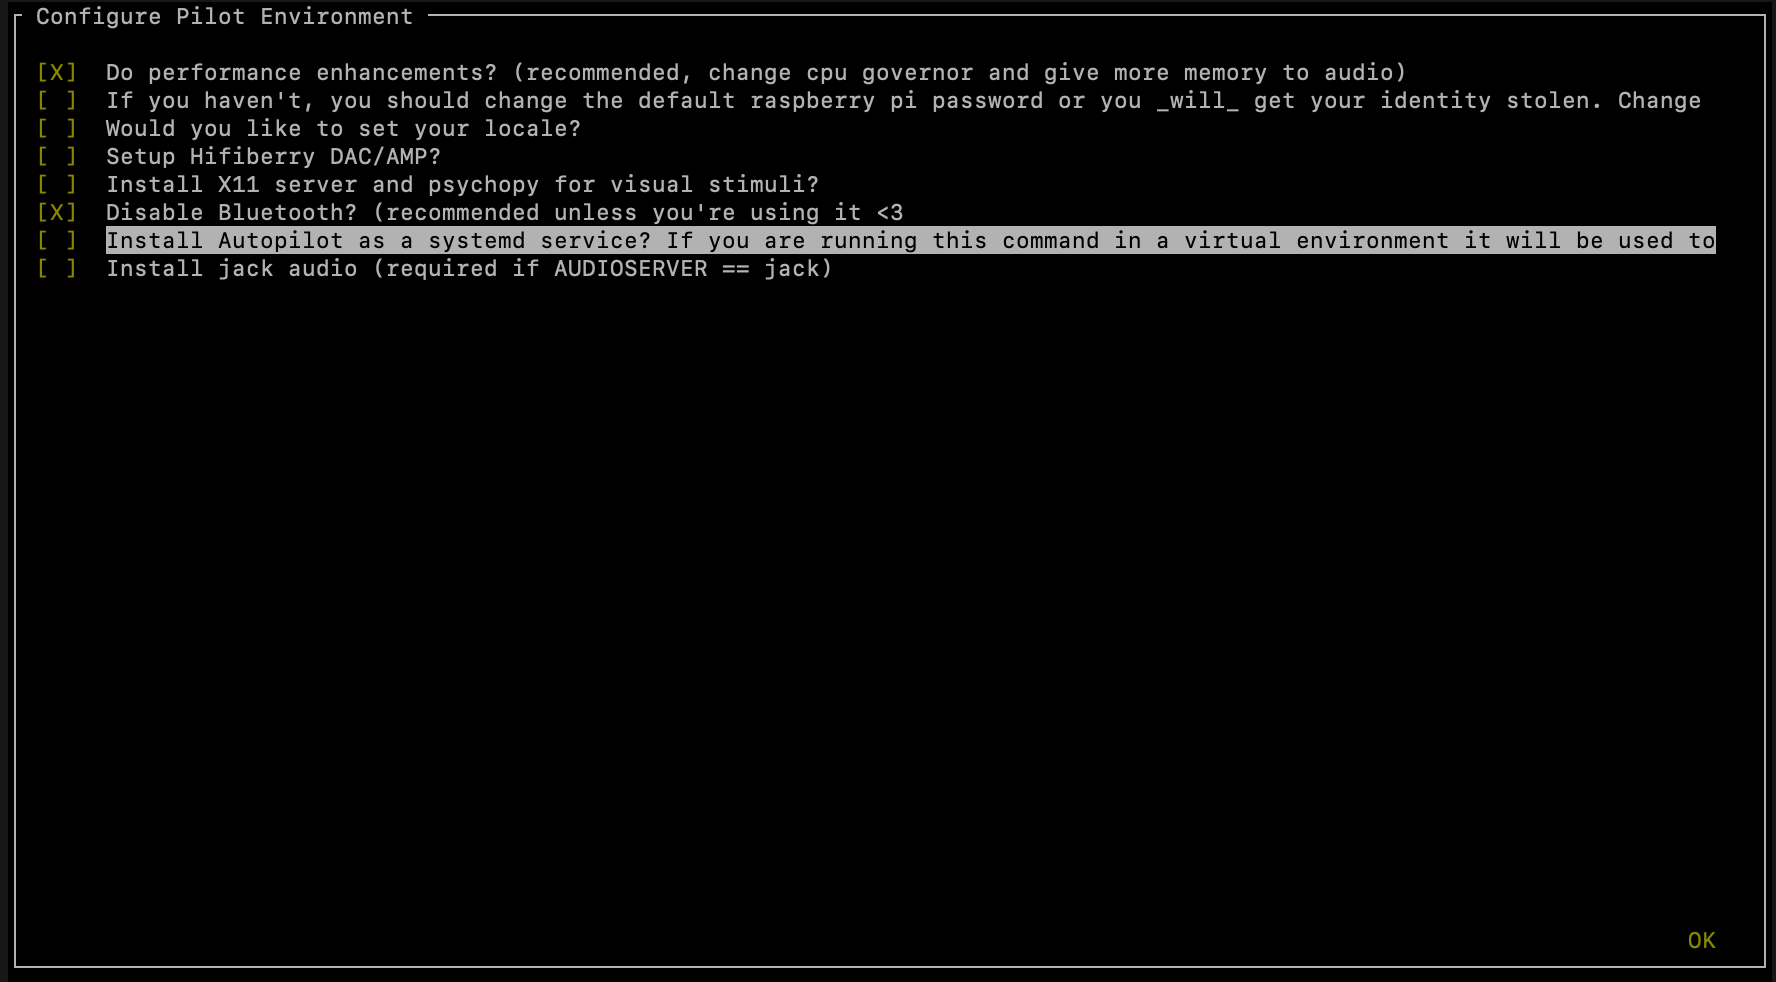
Select scripts
Now you will see a menu of potential scripts that can be run.
Select the scripts you want to run, and then hit “OK”. Note that even the simplest task (“free water”) requires pigpio,
so you may want to include that one. You can see the commands that will be run in each of these scripts with setup.run_script
in the setup.scripts.SCRIPTS dictionary.
Note
Autopilot uses a slightly modified version of pigpio (https://github.com/sneakers-the-rat/pigpio) that allows it to
get absolute timestamps (rather than system ticks) from gpio callbacks, increases the max number of scripts, etc. so
if you have a different version of pigpio installed you will need to remove it and replace it with this one (you can
do so with python -m autopilot.setup.run_script pigpiod
Configure Agent
Each agent has a set of systemwide preferences stored in <AUTOPILOT_DIR>/prefs.json and accessible from autopilot.prefs.

Configure Hardware
If configuring a Pilot, you’ll be asked to configure your hardware.
Press ctrl+x to add Hardware, and fill in the relevant parameters (most are optional and can be left blank).
Consult the relevant page on the docs to see which arguments are relevant and how to use them.
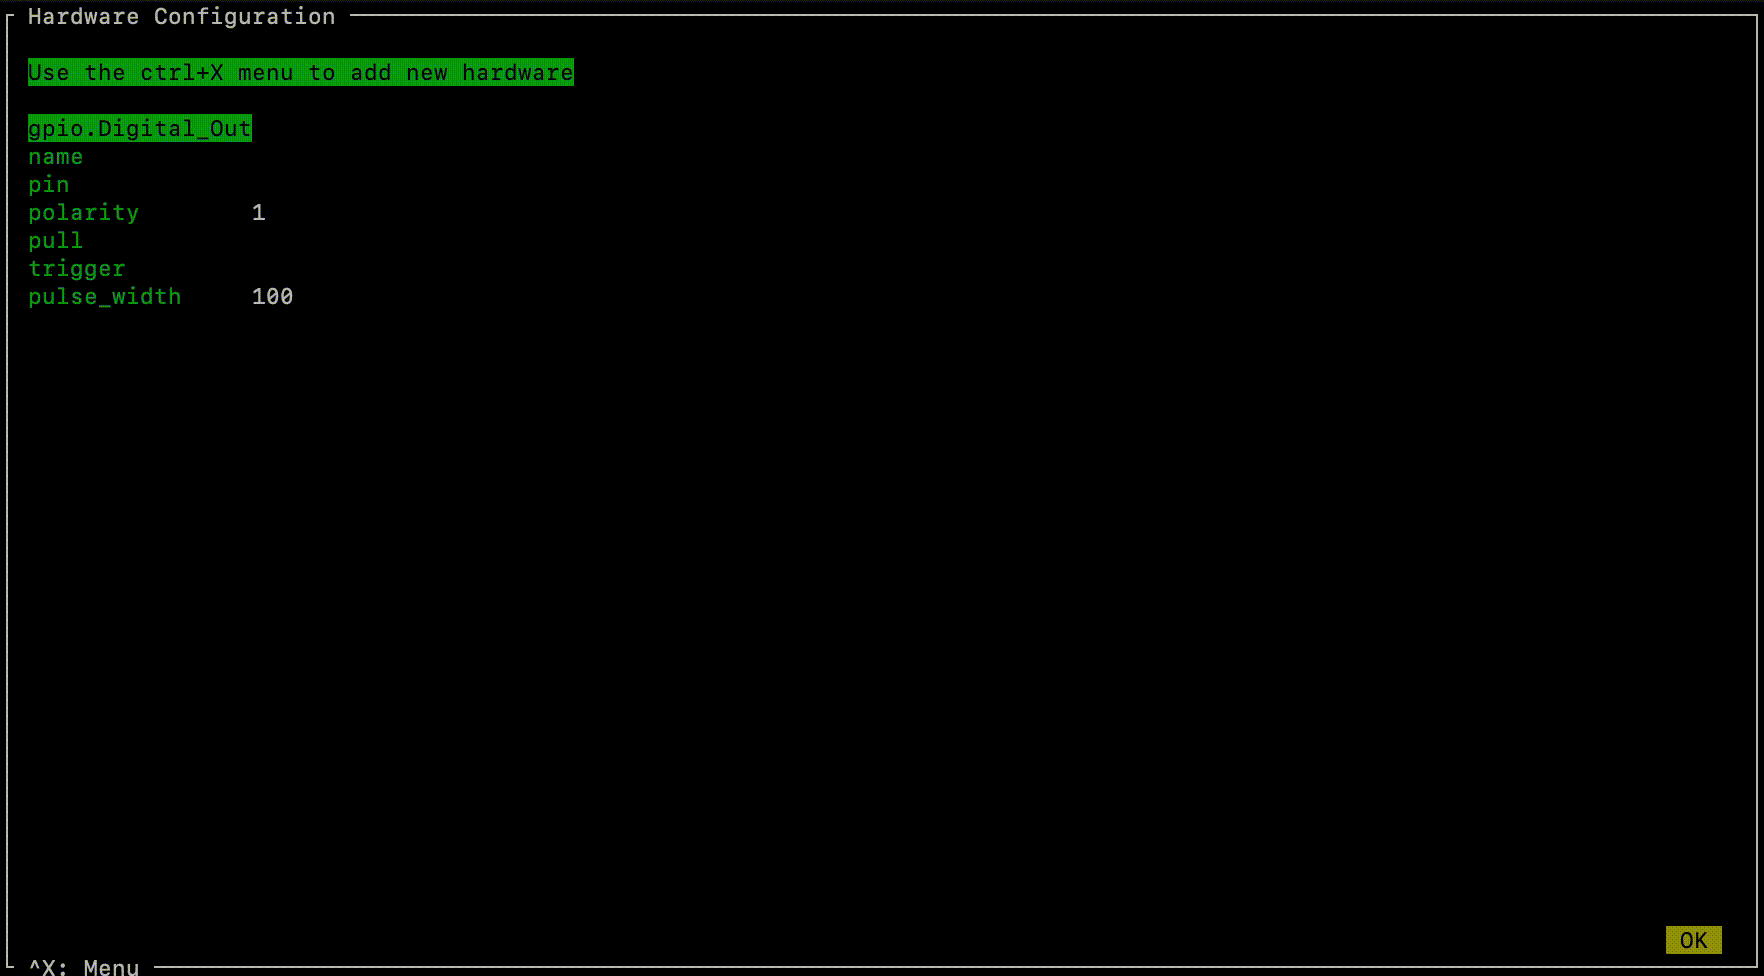
After completing this step, the file prefs.json will be created if necessary and populated with the information you just provided. If it already exists, it will modified with the new information while preserving the previous preferences.
You can also manually edit the prefs.json file if you prefer. A template version for the Pilot is available that defines the ports, LEDs, and solenoids that are necessary for the “free water” task, which may be a useful way to get started.
Networking
Note
Networking is a point of major future development, particularly how agents discover one another and how ports are assigned. Getting networking to work is still a bit cumbersome, but you can track progress or contribute to improving networking at issue #48
IP Addresses
Pilots connect to a terminal whose IP address is specified as TERMINALIP in prefs.json
The Pilot and Terminal devices must be on the same network and capable of reaching one another. You must first figure out the IP address of each device with this command:
ipconfig
Let’s say your Terminal is at 192.168.1.42 and your Pilot is at 192.168.1.200. Replace these values with whatever you actually find using ipconfig.
Then, you can test that each device can see the other with ping. On the Terminal, run:
ping 192.168.1.200
And on the Pilot, run:
ping 192.168.1.42
If that doesn’t work, there is something preventing the computers from communicating from one another, typically this is the case if the computers are on university/etc. internet that makes it difficult for devices to connect to one another. We recommend networking agents together using a local router or switch (though some have reported being able to use their smartphone’s hotspot in a pinch ).
Ports
Agents use two prefs to configure their ports
MSGPORTis the port that the agent receives messages onPUSHPORTis the port of the ‘upstream’ agent that it connects to.
So, if connecting a Pilot to a Terminal, the PUSHPORT of the Pilot should match the MSGPORT of the Terminal.
Ports need to be “open,” but the central operation of a firewall is to “close” them. To open a port if, for example,
you are using ufw on ubuntu (replacing with whatever port you’re trying to open to whatever ip address):
sudo ufw allow from 192.168.1.200 to any port 5560
Testing the Installation
A launch script should have been created by setup_autopilot at <AUTOPILOT_DIR>/launch_autopilot.sh –
this is the primary entrypoint to autopilot, as it allows certain system-level commands to precede launch (eg.
activating virtual environments, enlarging shared memory, killing conflicting processes, launching an x server, etc.).
To launch autopilot:
~/autopilot/launch_autopilot.sh
Note
Selecting the script alias in setup_autopilot allows you to call the launch script by just typing autopilot
The actual launch call to autopilot resembles:
python3 -m autopilot.core.<AGENT_NAME> -f ~/autopilot/prefs.json