Pilot Setup
Scripted Installation
The pilot preinstallation and setup routines are in two scripts, presetup_pilot.sh and setup_pilot.py.
Setting up a pilot then just requires you run those two scripts, which will prompt you as you go:
cd <repo_directory>/autopilot/setup
./presetup_pilot.sh
sudo python ./setup_pilot.py
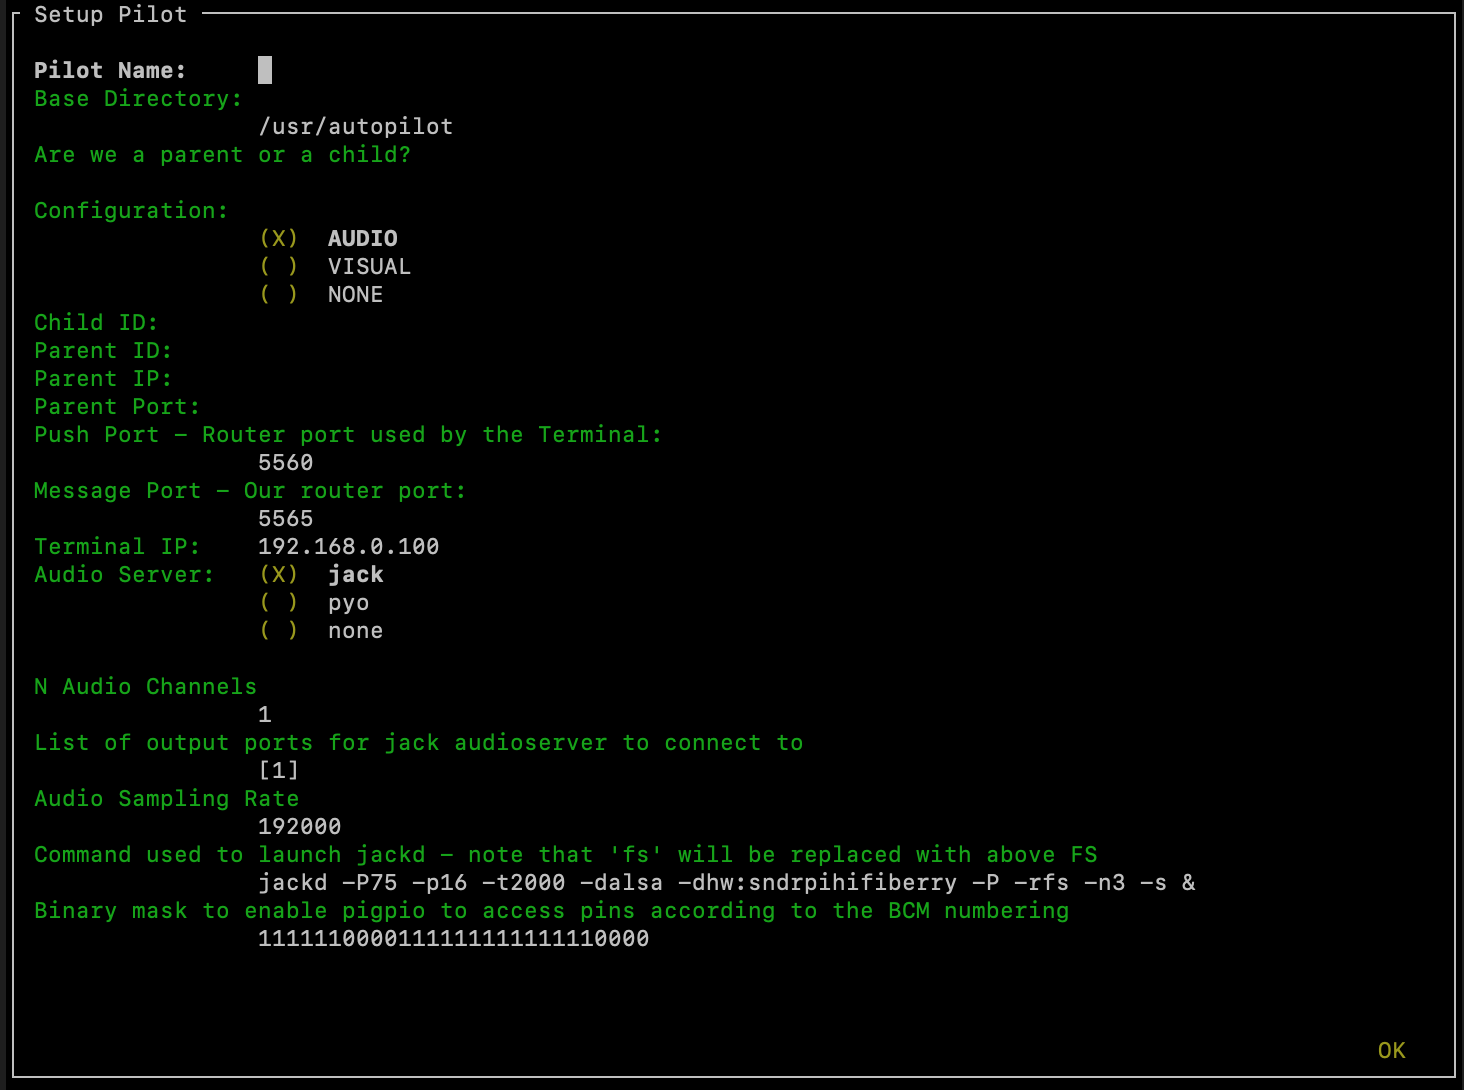
The setup_pilot script produces the prefs.json file (see prefs) and uses npyscreen to enable graphical parameter setup on headless machines and over SSH. The prefs.json file can be manually edited to add any additional configuration options needed by your system.
Basic Configuration
Pilot name: The name that will be used to address messages to the Pilot and identify it across the system. This should be unique within a swarm.
Base Directory: The parent directory that will be used for all Autopilot data – preferences files, data, logs, etc.
Lineage: (“Are we a parent or a child?”) - can be
PARENTorCHILD.Configuration: (Still experimental) Whether the Pilot has been set up for audio stimuli (and thus launches a
jackserver, etc.), visual stimuli (X11 server) or neither.Child/Parent Settings: The ID of any parent or child that this pilot has. Since Autopilot’s networking structure is treelike (see the whitepaper), an IP and Port are only necessary for a child that is connecting to a parent
Push/Message Port: The
pushport is the port that messages are pushed to and should correspond to the port used by the upstream node, whether that be a Terminal or a Parent. Themessageport is the port opened to receive messages by the Pilot’sStationobject.Terminal IP: The IP address of the Terminal. Ideally the Terminal has a static, local IP address, but this can be changed at any time by editing the
prefs.jsonfile.
Audio Configuration
If the CONFIG is set to VISUAL, these options are ignored. We will make the setup menu responsive in future versions (see To-Do).
Audio Server: While both options use
jackas a backend, choose between using our internalJackClientthat dumps samples directly into Jack streams (strongly recommended) or pyo which is a more flexible synthesis library but has issues with latency and reliability and will likely be deprecated in future versionsN Audio Channels: How many audio channels should be used for output.
Output Ports: The indices of output that should be used (depending on whether you have connected a speaker to the left or right audio out, for example)
Sampling Rate: The sampling rate that will be used by the jack server.
Jackd String: The string used to launch jack, see the jackd manpage. The default configuration is:
-P75 - Sets jackd to operate with a high realtime priority
-p16 - Maximum number of ports (16) that the jack server can manage
-t2000 - Set a 2000ms timeout before our client is kicked from jackd’s client pool.
-dalsa - Use alsa as the hardware backend (strongly recommended)
-dhw:sndrpihifiberry - Use the HiFiBerry as the output device. Customize this to your own sound card by replacing with a device listed by
aplay -l-P - Playback only mode
-rfs - Sets the sampling rate, leave as “fs” to have this replaced by the sampling rate specified previously
-n3 - Latency is
--nperiods*--period(number of samples in a period) /--rate. This sets the number of periods to 3 to make buffer underruns less likely while slightly increasing latency-s - “Soft mode,” Ignore buffer under/overruns from ALSA.
The next menu screen sets the hardware options:

These settings create a HARDWARE dictionary that maps hardware objects based on their type and name to a GPIO pin number. These names are the same as those used by tasks to parameterize hardware requirements.
The HARDWARE that are set by default are
POKES - IR
Beambreaks, digital logic inputLEDS -
LED_RGBs, which use 3 pins modulated by PWM to output RGB colors.PORTS -
Solenoids, which dispense water rewards, digital logic output.FLAGS -
Flags, which are a trivial subclass ofBeambreakwith their default logic directions reversed.
Additional hardware can be configured by editing prefs.json, so for example if your task calls for:
HARDWARE = {
    'POKES':{
        'L': hardware.gpio.Digital_In
        }
    }
then one could add an entry to the HARDWARE dictionary in prefs.json like:
"HARDWARE": {
    "POKES": {
        "L": {
            "pin": 1,
            "polarity": 1,
            "pull": 0,
            "trigger": 'U'
        }
    }
}
(See Digital_In and the metacalss GPIO for parameter documentation)
Todo
The npyscreen setup wizard will be extended so that hardware can be added w/ parameters graphically, see To-Do
The setup script will then create a launch script (ie. <BASE_DIR>/launch_pilot.sh) and optionally install the Pilot to run as an always-on systemd service. If the Pilot is not setup as a systemd service, it needs to be started manually using the launch_pilot.sh script.
Manual Preinstall
Rasbian Installation
Download Raspbian Lite and unzip
Use
ddto write the Raspbian disk image to a microSD card. Note thatddcan and will mess up your entire life if given the opportunity, be very careful that you don’t run the command until you’re sure yourif=andof=are correct.macOS:
# get the number of the disk, should be something like /dev/disk2
diskutil list

# unmount the disk, using the disk # from before.
sudo diskutil unmountDisk /dev/disk#

# use dd to copy (use ctrl+t to check transfer status)
# note the use of rdisk rather than disk the number should be the same
sudo dd if=/path/to/raspbian.img of=/dev/rdisk# bs=1m
linux (use admin privileges when needed with
sudo):# get the number of the disk, should be something like /dev/randomnumbersandletters fdisk -l # unmount the disk umount /dev/<your_disk> # use dd to copy (use ctrl+t to check transfer status) # note the use of rdisk rather than disk the number should be the same dd if=/path/to/raspbian.img of=/dev/<your_disk> bs=1M
Boot from the SD card. It should reboot once after it resizes the filesystem. Login with the default credentials:
username:
pipassword:
raspberry
Do an initial
updateandupgradeto grab any critical security fixes so we don’t get sunk before we get started:sudo apt-get update ** sudo apt-get upgrade -y
Optional: Change the default password. You’ll be sorry if you don’t – I got my credit card stolen this way.
passwdand follow the prompts
Install necessary system packages:
sudo apt-get install -y \
    build-essential \
    cmake \
    git \
    python-pip \
    python2.7-dev \
    python3-distutils \
    libsamplerate0-dev \ # audio requirements are from here...
    libsndfile1-dev \    #
    libreadline-dev \    #
    libasound-dev \      #
    i2c-tools \          #
    libportmidi-dev \    #
    liblo-dev \          # to here.
    libhdf5-dev \
    python-numpy \       # install these python packages through apt,
    python-pandas \      # take forever to build them on the raspi
    python-tables \      # this one too
    libzmq-dev \
    libffi-dev \         # Allows us to call C functions from python
    python-cffi \
    blosc
And Python packages:
sudo -H pip install -U \
    pyzmq \        # ZeroMQ wrapper
    npyscreen \    # ncurses wrapper used for setup menus
    JACK-Client \  # client for jack audio
    tornado \      # tornado message server
    inputs \       # interactions with USB devices
    blosc          # compression for networking objects
Autopilot depends on a modified version of pigpio for high performance GPIO access and control, so install it already:
git clone https://github.com/sneakers-the-rat/pigpio.git
cd pigpio
make -j6
sudo -H make install
Raspbian Performance Improvements
All of these are, strictly speaking, optional, but there’s not really a good reason not to do them…
Change the CPU Governor - Change the CPU Governor - normally the RPi keeps a low clock speed when not under load, raising it when load increases. this can cause audible glitches which are obviously to be avoided.
the RPi has a startup script (confusingly, /etc/init.d/raspi-config) that sets the cpu governor to on demand. disable it
sudo systemctl disable raspi-config
Add a line to
etc/rc.local, which runs on boot, that changes the governor to “performance”Either add this above ‘exit 0’:
echo "performance" | sudo tee /sys/devices/system/cpu/cpu*/cpufreq/scaling_governor
Or run this which does it for you:
sudo sed -i '/^exit 0/i echo "performance" | sudo tee /sys/devices/system/cpu/cpu*/cpufreq/scaling_governor' /etc/rc.local
Disable Bluetooth
Add
dtoverlay=pi3-disable-btto/boot/config.txt, or use this:sudo sed -i '$s/$/\ndtoverlay=pi3-disable-bt/' /boot/config.txt
Disable other bluetooth services:
sudo systemctl disable hciuart.service
sudo systemctl disable bluealsa.service
sudo systemctl disable bluetooth.service
You can decrease the memory that is allocated to the video card, but keep in mind pigpio allocates its memory from the GPU store. Don’t reduce to lower than ~8MB
sudo raspi-config> Advanced > Memory Split
Audio Setup
Autopilot uses Jack Audio to play sounds.
Clone jack:
git clone git://github.com/jackaudio/jack2 --depth 1
Configure, build, install:
cd jack2
# use ./waf --help to list compile options
./waf configure --alsa=yes --libdir=/usr/lib/arm-linux-gnueabihf/
./waf build -j6
sudo ./waf install
sudo ldconfig #reconfigure links
Give jack some more juice:
# let jack use more memory than Raspbian wants it to
sudo sh -c "echo @audio - memlock 256000 >> /etc/security/limits.conf"

# let jack take a higher priority than Raspbian wants it to
sudo sh -c "echo @audio - rtprio 75 >> /etc/security/limits.conf"
Install the jack python wrapper:
sudo -H pip install JACK-Client
We also use the the Hifiberry Amp 2 as our soundcard and amplifier.
Add pi user (or whatever username you’re using) to i2c group:
sudo adduser pi i2c
Turn onboard audio off and enable hifiberry overlays in
/boot/config.txt.Comment out:
# dtparam=audio=onAdd:
dtoverlay=hifiberry-dacplus
dtoverlay=i2s-mmap
dtparam=i2c1=on
dtparam=i2c_arm=on
Or use these commands which do it for you:
sudo sed -i 's/^dtparam=audio=on/#dtparam=audio=on/g' /boot/config.txt
sudo sed -i '$s/$/\ndtoverlay=hifiberry-dacplus\ndtoverlay=i2s-mmap\ndtoverlay=i2c-mmap\ndtparam=i2c1=on\ndtparam=i2c_arm=on/' /boot/config.txt
Edit ALSA configuration (
/etc/asound.conf) so hifiberry is default sound card.Make it look like this:
pcm.!default  {
 type hw card 0
}
ctl.!default {
 type hw card 0
}
Or use this:
echo -e 'pcm.!default {\n type hw card 0\n}\nctl.!default {\n type hw card 0\n}' | sudo tee $ALSAFILEReboot and test with
aplay -lwhich should look something like this:pi@raspberrypi:~ $ aplay -l **** List of PLAYBACK Hardware Devices **** card 0: sndrpihifiberry [snd_rpi_hifiberry_dacplus], device 0: HiFiBerry DAC+ HiFi pcm512x-hifi-0 [] Subdevices: 1/1 Subdevice #0: subdevice #0
Video Setup
If you’re using Autopilot to present visual stimuli, it runs in an X11 instance and uses PsychoPy
Psychopy and X11 both have quite a few dependencies. Currently, there is no
opencv-pythonwheel available for the raspberry pi (it can be compiled manually <https://www.learnopencv.com/install-opencv-4-on-raspberry-pi/>), so we have to install the psychopy dependencies piecemeal.:# X11 dependencies sudo apt-get install -y \ xserver-xorg \ # graphics server xorg-dev \ # development headers xinit \ # interface for graphics server xserver-xorg-video-fbdev \ # frame buffer python-opencv \ # opencv python bindings mesa-utils # Psychopy dependencies pip install \ pyopengl \ pyglet \ pillow \ moviepy \ configobj \ json_tricks \ arabic-reshaper \ astunparse \ esprima \ freetype-py \ gevent \ gitpython \ msgpack-numpy \ msgpack-python \ pyparallel \ pyserial \ python-bidi \ python-gitlab \ pyyaml \ sounddevice \ soundfile
Enable the Raspberry pi’s OpenGL driver:
sudo raspi-config> advanced > GL Driver > “GL (FakeKMS)”then reboot
Psychopy uses a few video backends, but in our experience glfw is the fastest. We have to compile it manually:
git clone https://github.com/glfw/glfw
cd glfw
cmake .
make -j7
sudo -H make install
After all dependencies have been installed, install Psychopy.:
pip install psychopy --no-deps
Set the default backend to glfw:
nano ~/.psychopy3/userPrefs.cfg
# add the line
winType = "glfw"
Optional Installation Steps
sudo dpkg-reconfigure locales sudo dpkg-reconfigure keyboard-configuration
Todo
Optional: Setup SSH access and install RSA key